AppInventor.org Award from American Library Association (ALA)

AppInventor.org was recently designated one of the Best Websites for Teaching and Learning, by the American Association of School Libraries (AASL). The award was announced at the American Library Association’s annual conference (press release).

AppInventor.org was developed at the University of San Francisco (USF) under the direction of Professor David Wolber and with the contributions of numerous USF students (see below). The site teaches beginners how to build apps with the drag-and-drop coding language, MIT App Inventor. The site reaches thousands of self-directed learners each month and provides a “Course-in-a-Box”  for teachers of all levels.

AppInventor.org and this award are only possible because of the amazing App Inventor language and the amazing work of Hal Abelson and the MIT App Inventor team. Great work everyone!


AppInvento.org USF Student Contributors
Thomas Oropeza
Jordan Goldin
JD Manuel
Vincent Zhang
Bin Lu
Brian Liberman
Cayla Shaver
Leonard Fernando
Jennifer Cruz-Hernandez
Olivia Kumar
Adam Toth-Fejel
Kelly Lazara
Andrea Conway


App Inventor Workshop for Teachers This Summer

Professional Development Workshop

June 26-June 30, 2017, 10 am – 3 pm
University of San Francisco

High School and Middle School Teachers, we are offering a free professional development workshop this summer, led by Master Teacher Tom Clifford of Carmel High School along with Professors David Wolber (appinventor.org) and Alark Joshi of USF, who run USF’s Democratize Computing Lab (democratizecomputing.org)

The Workshop will focus on programming with App Inventor along with computer science fundamentals. App Inventor is a visual blocks language that is highly accessible to beginners and fun– you get to build apps for phones and tablets!  If you are interested in bringing coding and computer science into your classroom, App Inventor is a great way to learn and a great way to teach.

High School Teachers:
The in-person workshop, held June 26-June 30, will introduce the Mobile Computer Science Principles (CSP) curriculum. A 3-week online follow-up course, July 3-July 21 will be available and will include support from the instructors. Stipends are available if you complete the 4 weeks and get principal approval for teaching a Mobile CSP course in the 2017-18 academic year.  

Middle School Teachers: We will provide breakout sessions for middle-school specific lessons and discussions. Please see this link to see what some San Francisco middle schools have piloted this year: Click Here. https://appinventorblog.com/2016/09/14/new-app-inventor-curriculum-for-sf-middle-schools/

Apply Now!  Please apply at https://goo.gl/forms/gaXv7Oc7P90A258g2. Spots are limited!

For more info, please contact Professor David Wolber (wolberd@usfca.edu)

App Inventor Workshop in Doha, Qatar


IMG_6507

Photo Credit: Hamda

On March 7, 2017, I was invited to speak to students and teachers at the UNESCO YouthMobile event in Doha Qatar. YouthMobile was part of TumuhaTEC’s Digital Youth Festival at QITCOM 2017, Qatar’s biggest digital Expo. Qatar’s Ministry of Transport and Communication and Ministry of Education created the Youth Festival to introduce students ages 8 and up to innovative digital technologies and provide an interactive space for exploration.

In addition to a series of inspiring Tech Talks center stage (which included 15 year old serial inventor Fatima Al Kaabi) students engaged in hands-on activities throughout the hall including: building Lego robots, testing the capabilities of 3-D printers, collaborating in the digital productions, racing remote control maker cars, and designing mobile apps with MIT App Inventor.

Noticeably present were zones for “girls in tech” to welcome and encourage girls to participate in various digital opportunities both on site and in society. Mentors from the newly formed group, Arab Women in Computing were present to help demonstrate and teach mobile app development with App Inventor. Instruction took place in both English and Arabic. My favorite app that a group of girls created had a Harry Potter theme.

Teachers also had their own opportunity to learn, play and discover new digital tools in the Educator Empowerment zone.

IMG_6498

Photo Credit: Fatima Al Kaabi


More on FirebaseDB

You may have already tried the App Inventor component FirebaseDB or read about it in a blog post earlier this year, but in case you are new to App Inventor, here is the scoop.

Databases are essential features when creating apps because they are used to store information. For example, on a map app, you don’t have to re-enter your home address every time you want to head home because the app stores and retrieves that information for you. Or, when you play a game, you don’t have to stop and think what your previous score was because it displays. Or, if you’re having a party, you don’t have to worry about keeping track of RSVPs in your head because an event app will remember who is coming and who can’t make it.

When creating apps in App Inventor, if you don’t add a database component to your app, no inputted information will be saved and the next time the app starts up, it won’t recall or retrieve any previous data. The TinyDB component allows for persistent data- so each time the app is closed and reopened, the data is available.

The good: TinyDB saves data when an app closes and reopens and shares data between multiple screens within the app

The bad: TinyDB does not share data between multiple users

This means if multiple people use the same event app, they both won’t see the same RSVP list or if they play the same game, they won’t see the same score history. This is where FirebaseDB comes in handy.

FirebaseDB is still an experimental component on App Inventor, but is worth exploring since this cloud database retains and retrieves data when an app closes and reopens and shares consistent, up-to-date data across many users. Everyone who is using the app will see the same information.

More FirebaseDB Learning Modules coming soon! In the meantime take a look at NoteTaker.

New App Inventor Curriculum for SF Middle Schools

screen-shot-2016-09-14-at-10-14-52-amThe San Francisco Unified School District (SFUSD) is making great strides in rapidly adding computer science courses to the curriculum in public middle schools and high schools, and App Inventor is a vital part of it.  SFUSD’s Bryan Twarek and Andrew Rothman have designed an on-line middle school curriculum which combines video and other lessons from appinventor.org, Mobile-CSP.org, appinventor.mit.edu, and a number of other venues, and breaks lessons down into 50 minute classroom chunks. The well-organized site is being used this fall in SF middle schools. Check it out and contact Bryan (twarekb@sfusd.edu) to get access to the teacher side of it.

The middle school curriculum is part of SFUSD’s Computer Science for All Students in SF effort. The goal is to make real computer science– with coding and problem solving– part of the curriculum throughout the grade levels, and to help broaden participation in Tech, as this excerpt from their site attests:

By beginning in the earliest grades and with all children, we will normalize a discipline that has been long dominated by a selective group of the population.

SFUSD teachers are also teaching some of the first AP High School Computer Science Principles (CSP) courses on the West Coast, an effort led by SFUSD’s Jennie Lyons.

The Democratize Computing Lab at the University of San Francisco is  partnering with the school district in these efforts. Led by my colleague Alark Joshi and I, we provide materials and advice on curriculum development, offer summer training workshops for high school  teachers, and facilitate a program whereby USF students in the Democratize Computing Lab assist teachers at schools sites each semester.

Dave Wolber

Test Your App Inventor Knowledge

Test-Your-AI-Knowledge_sign2

If you have been reading App Inventor tutorials, discovering new apps in the App Inventor Gallery, building apps from scratch and expanding your coding capabilities, its time to:

Test Your App Inventor Knowledge!

This simple quiz will determine if you’re on track learning the latest updates to the App Inventor platform.

Question 1

You are frustrated because of the limited color options available in the App Inventor Designer, so you use:

  • A)   the color grid in the Blocks Editor
  • B)   the Make Color block in the Blocks Editor
  • C)  the Screen Initialize and Set Background Color blocks

Question 2

You have a lot of data to display and want to create a streamlined UI, so you use which of the following Components?

  • A)   VerticalArrangement
  • B)   TableArrangement
  • C)   VerticalScrollArrangement

Question 3

You want to change the shape of some Buttons, so you use which of the following properties?

  • A)   Width
  • B)   Shape
  • C)   Image

Question 4

When creating an app with multiple screens, you can use which of the following blocks?

  • A)   Close screen
  • B)   Open another screen
  • C)   When Button1.Click

Question 5

To create a form in the Designer, which of the following could you use?

  • A)   Textbox Hint Property
  • B)   Label Component
  • C)   HorizontalArrangement Component

Question 6

To create a new color in App Inventor with the Make Color block, you could:

  • A)   Input any color’s RGB value
  • B)   Access one of 16 million colors
  • C)   Find a color on the Adobe Kuler Wheel

Question 7

To make a copy of the app you are working on you could use:

  • A)  Save project as
  • B)  Checkpoint
  • C)  Export selected proejct

All About Buttons

Screen Shot 2016-06-21 at 10.19.41 PM.png

Buttons are an essential component in creating mobile apps on App Inventor. You can use them to do things like submit information, navigate screens, clear data, and stop or start game play. Here is a quick intro guide to creating and using buttons in App Inventor.

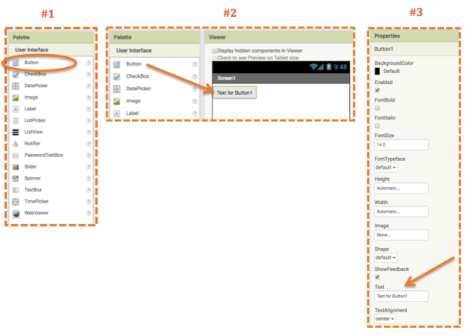
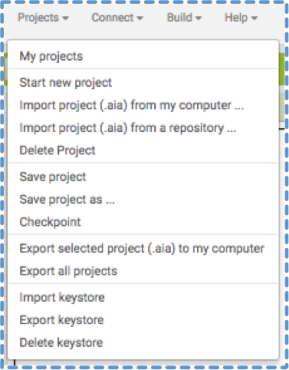
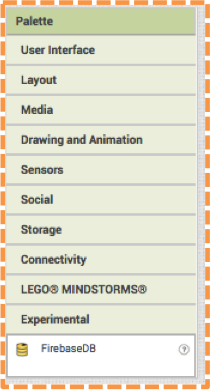
The Button component is found at the top of the User Interface Palette in the Designer.

Click on the Button at the top of the User Interface Palette (#1) on the left side of the screen and drag it to the Viewer (#2). The Button automatically displays “Text for Button1”, which you can easily change in the properties panel text box (near the bottom on the far right of the screen, #3).

Screen Shot 2016-06-21 at 9.56.04 PM

Changing the text that appears on the button is part of the UI design that the app user will see. Depending on what the button will be used for, it could display instructions like: “Submit,” “Next,” “Play,” etc.

Note: Changing the button display text should not be confused with renaming the button. Changing the button name helps you, the designer/coder, to keep your buttons organized. Thus “SubmitButton” is an appropriate name for a button that displays the text “Submit”.

Screen Shot 2016-06-21 at 10.19.20 PM.png

A key coding principle for buttons (and for many components) is naming them appropriately. Whenever you create a new button in the Designer, it will automatically be named Button1, Button2, Button3, etc. When you first start building apps, your interface will be simple and thus it will be easy to keep track of which buttons perform which functions. But as you progress to creating more complex applications, you will quickly discover that it is difficult to remember what Button7 or Button14 does. Thus, it is good practice to rename buttons to clearly describe their function so that when you begin coding in the Blocks Editor, each button purpose is obvious.

The recommended standard is to use a capitalized descriptive name, followed by the capitalized component name – with no spaces between words. Examples include: “SubmitButton”, “NextButton” or “PlayButton”. (AppInventor doesn’t allow spaces so if you type the name “Submit Button” with a space in between the words, App Inventor will automatically insert an underscore and name your button “Submit_Button”.)Screen Shot 2016-06-21 at 9.58.14 PM

To rename a button, activate it by clicking on it in the Viewer or in the Components Panel (it will highlight with a light green box around the name). Then click the “Rename” button at the bottom of the Components Panel (#4). A pop-up window will appear, insert the new name into the text box and click “OK” (#5).

Screen Shot 2016-06-21 at 10.02.52 PM

Note: If for example you rename your first button from Button1 to “PlayButton”, and then drag another button onto the Viewer, App Inventor will name it Button1 even though it is not the first button you created. ThScreen Shot 2016-06-21 at 10.10.21 PM.pngis example illustrates the importance of not relying on the order of creation, but rather on appropriate naming to keep buttons organized.

Any changes you make in the Designer will be reflected in the Blocks Editor (#6). Notice at the bottom of the Blocks Palette, there is another option to Rename (or delete) buttons. Thus, changes can be made there as well.

Screen Shot 2016-06-21 at 10.22.24 PM

If you decide that a button is no longer needed, deleting it is simple. Click on the button in the Viewer or Components Panel in the Designer or in the Blocks Panel in the Editor and then click “Delete”. A pop-up window will confirm deletion (#7). Click “OK”.

Screen Shot 2016-06-21 at 10.10.30 PM.png

Screen Shot 2016-06-21 at 10.16.48 PM.png

The Properties Panel in the Designer provides many options to change the format of your buttons. Click on the button in the Viewer or the Components Panel to see a list of options. The changes you make to the properties are reflected in the Viewer (#8 & #9).

Screen Shot 2016-06-21 at 10.15.21 PM.png

And of course, to get the full effect of how your app will look, it is always recommended to view your changes live on your mobile device or with the on-screen emulator.

For information on coding buttons, stay tuned for All About Buttons, Part 2.


What the Heck is Checkpoint?

At some point, all of us computer users have experienced the pain, frustration and anxiety of losing some amount of work due to an application that has “unexpectedly quit”. Losing your work to a system error needs to only happen once before one becomes more vigilant about saving work or creating a backup. When creating apps in App Inventor, it is easy to forget to “save” because the platform does it for you (every 5-30 seconds). In theory, there is no need to save a project that is already being saved. But, in reality, I would recommend to save, save, save.

Given that advice, what are the App Inventor saving options?

You can save projects in App inventor and to your computer. All of the options are under the Projects Menu (in both the Designer and Blocks Editor). You will find Save project, Save project as… and Checkpoint along with Export selected project (.aia) to my computer and Export all projects.

Checkpoint 1Save project is the manual version of the automatic save feature. It merely reassures you that your project is saved and you continue working in the same version of your project. Use Save project for peace of mind.

Save project as… works similarly to a Save As in Microsoft Word. It allows you to save the project with a different name and afterwards, begin working in the new version of the project. Your previous version is saved in My Projects. Use Save project as… for peace of mind.

Checkpoint also makes a copy of your current project, but allows you to keep working in the original project. Creating a Checkpoint, essentially takes a snapshot of your project at a point in its development and saves it in My Projects. You may want to create many Checkpoints along the course of building your app as it grows in complexity. For example, if you create a Checkpoint before you add a database then encounter a problem or a bug that you are not sure how to fix, you can always re-open the Checkpoint that did not contain the database and start anew.

When you create a new Checkpoint, App Inventor shows you a list of previous Checkpoints and the time/date they were saved. Checkpoint 2

Once you have completed your app, you always have the option to delete or keep your Checkpoints. Use Checkpoint for peace of mind.
Checkpoint 3

In addition to saving your projects within the App Inventor platform, you can also export your projects.

Export selected project (.aia) to my computer is a feature I cannot recommend enough. It’s easy, easy, easy to save an .aia file to a location on your computer and/or to an online storage system like Google Docs or Dropbox. And if you ever need to open that .aia file, just select Import project (.aia) from my computer… to bring it into your projects list in App Inventor. Use Export selected project (.aia) to my computer for peace of mind.

Tip of the day: For complete peace of mind, save your work within App Inventor and export your work to your computer.


FirebaseDB

FirebaseDB is the new App Inventor web database. Kind of. The uncertainty stems from the fact that this new web database component is currently being beta tested and will be updated based on user feedback. You can try it out, but don’t get too attached to its current form, because features may change by the time it is fully integrated. In case you forget this fact, you will be reminded every time you try to add this component to your project. Housed under the “Experimental” Palette drawer in the Designer, dragging this non-visible component to the Viewer will result in an alert reminding you of its provisional existence.

Fire 1Fire 2

I already love FirebaseDB and use it as if its current form were a permanent addition to my coding repertoire. Why is FirebaseDB so great?

Databases are used for many of reasons in mobile apps such as: to keep track of high scores in a game, to count the number of votes in an election, to save a variety outgoing text messages or to store the names of RSVPs to a book club event. FirebaseDB stores data in the cloud, which is helpful if you are perhaps vying to become a high scorer of a game. For such apps, both the app programmer and app user want this sort of data to be shared and persistent, meaning that once the app closes, the information is not gone forever, it will be saved and retrieved for all to see once the app reopens.

Fire 3.png

Example: For a simple note-taking app, users enter their username and a note and the app will display the note, the username and a time/date stamp. For this app to work, it must save and display notes from different users on various devices- a perfect scenario for FirebaseDB.

We programed this app so that when the user clicks “Submit,” the app stores data using the StoreValue block. In this case, it adds the values (user’s name, note, and date/time stamp) to a list called “global notes”. This information gets stored in the FirebaseDB under the tag that we named, “notelist”.

Fire 4.png

Each time the app opens, the GetValue block requests the most updated values stored under the “notelist” tag from the Firebase Service. When the value is received, the GotValue event fires retrieving the values saved in “notelist” and displays them in a List View.

The Firebase DataChanged event gets triggered anytime any user adds a new note. This is the amazing part because with FirebaseDB, all app instances receive this data and thus, are consistent. The previous App Inventor web database, TinyWebDB, did not have the ability to share data globally in this manner.

Fire 5.png

To become familiar with FirebaseDB, try building this note taker app and test how values from various users get saved, updated and displayed Or better yet, build a game app and see people around the world vie for the top scorer position!


*Note that the App Inventor emulator does not support the FirebaseDB component.


Hue New?

One only has to read a few tweets about the Uber or Instagram icon re-design to know how passionate people feel about mobile app design. Creating a Color blog 1
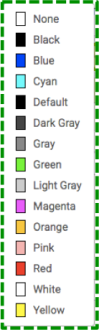
user-friendly (and pleasing) interface is as important as creating code that functions properly. Many App Inventor users assume that all UI features are found in the Designer. However, this is not the case in terms of colors. Over and over, I hear people reveal their frustration about the limited amount of colors available in App Inventor. At first glance, the Designer does seem to only offer a list of 8 saturated colors, along with white, black and a few grays. But really there are a multitude of color options if you know where to look. All you need to do is head over to the Blocks Editor.

Notice in the left menu, under “Built-in” there is an item called: Colors. Clicking on it reveals a list of color blocks that would once again lead you to believe that saturated colors are indeed the only options. Don’t be fooled.Color blog 2.png

Once you click on a color block, it will appear in the Viewer and clicking again on the actual color inside the block reveals a 7 x 10 grid of color hues! Hue new? Now you can select pastels, deeps and a range in between.

Color blog 3.png
What can you do with all of these color options? Well, since they are housed in the Blocks Editor, you can incorporate them into your code. For example, you can change the color of a component, (a button, a label, a screen background, a layout) by using the screen initialize block.

Color blog 4
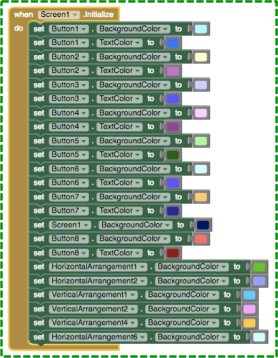
When your app launches or when you make a change in the Designer, the components will receive their newly hued instructions and your previously boring grey buttons will come to life!

Color blog 5.png